- Take one picture with the Focal Point centered in the composition.
- Take one picture with the Focal Point aligned with the Rule of Thirds in the composition.
Tuesday, January 29, 2019
Rule of Thirds Practice
Go out into the hallway and take 2 pictures.

Composing a photograph using the Rule of Thirds
Today you will take pictures using the Rule of Thirds. You will need to post 6 examples of the Rule of Thirds to your blog. For each example write an explanation of how the rule of thirds was used in each picture.
The rule of thirds is probably the most often referenced photography rule of composition. It is all about subject placement within the frame.
Imagine that your picture space is divided into thirds both horizontally and vertically, like a tic tac toe grid.
Here is a good example of what your post should look like. Repeat this for 6 photos, plus one that BREAKS the Rule of Thirds.
The rule of thirds is probably the most often referenced photography rule of composition. It is all about subject placement within the frame.
Imagine that your picture space is divided into thirds both horizontally and vertically, like a tic tac toe grid.

The photography rule of thirds tells us to align our subject with one of the points where those lines cross. That means our subject is one third of the way “into” the picture space – from either the top or bottom, and from either the left or right. And that means it’s not in the middle.
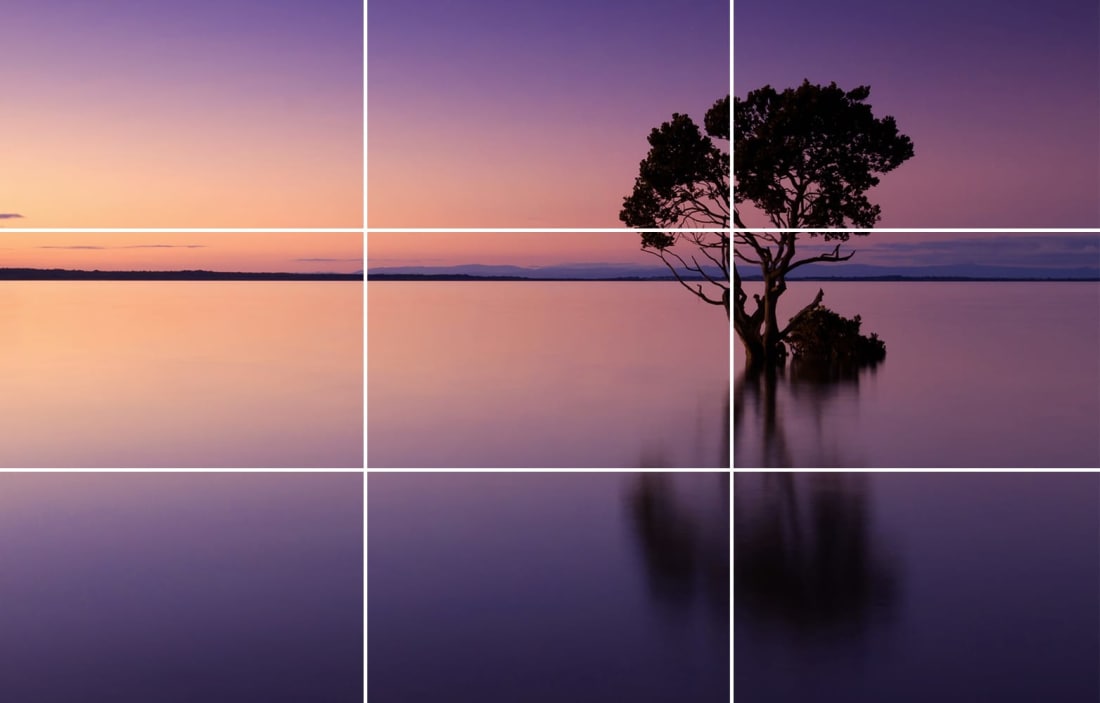
Here is an example of the rule of thirds for a landscape photo. The Focal Point, or Emphasis is on the tree and the bottom two-thirds of the photograph are composed of the lake and the top third is sky.
Here are additional links explaining and demonstrating the Rule of thirds.
http://digital-photography-school.com/rule-of-thirds
http://learnprophotography.com/rule-of-thirds
http://www.ultimate-photo-tips.com/photography-rule-of-thirds.html
Finding Correct Exposure
This morning you have taken 3 pictures.
One of the classroom with the ceiling lights on.
One of the trees and sky from the front doors of the building.
One of the classroom with the ceiling lights off.
Upload one correctly exposed example of each of these pictures and include the setting for ISO, Shutter Speed and Aperture.
One of the classroom with the ceiling lights on.
One of the trees and sky from the front doors of the building.
One of the classroom with the ceiling lights off.
Upload one correctly exposed example of each of these pictures and include the setting for ISO, Shutter Speed and Aperture.
Friday, January 25, 2019
Aperture-Depth of Field Exercise - Post to your Blog Today
Today you will experiment with capturing both shallow and deep Depth of Field.
Post your examples to your blog demonstrating both shallow and extended Depth of Field.
You should have 2 examples of both deep and shallow depth of Field.
follow the format below for each picture:
This pic was shot at ISO 400, Shutter Speed 1/125, aperture f 5.6.
The DoF is very shallow:

This pic was shot at ISO 1600, Shutter Speed 1/60, Aperture f 32.
it has a Deep Depth of Field.

Post your examples to your blog demonstrating both shallow and extended Depth of Field.
You should have 2 examples of both deep and shallow depth of Field.
follow the format below for each picture:
This pic was shot at ISO 400, Shutter Speed 1/125, aperture f 5.6.
The DoF is very shallow:

This pic was shot at ISO 1600, Shutter Speed 1/60, Aperture f 32.
it has a Deep Depth of Field.

Post Your Aperture Depth of Field Practice
Post the 2 pics of the ruler that you took in class today


- One will show Shallow Depth of Field and the ISO, Shutter Speed and Aperture
- One will show Deep Depth of Field and the ISO, Shutter Speed and Aperture
Shallow D.o.F
ISO 400
Shutter Speed 1/60
Aperture f 5.6

Deep D.o.F
ISO HI 1
Shutter Speed 1/60
Aperture f 36

Wednesday, January 23, 2019
Aperture - The AMOUNT of light let into the camera
Aperture is the opening in the lens that controls the AMOUNT of light that you allow to enter the camera.
It is measured in a thing we call the F number.

As you decrease the size of the Aperture you increase the amount of the picture that is in focus. This is called Depth of field.
Watch the following video for a good explanation of how Aperture works. We'll began using different F Stops and doing Depth of Field exercises later in class.
http://www.youtube.com/watch?v=lUbjkMm_v-A
Depth of Field is the amount of the image that is in sharp focus
Here is the a link that describes how and when to use Aperture Priority
Here's link that descibes how to take better pictures using Aperture Priority.
Use the Nikons to experiment with Depth of Field around the building. Take pictures with both Shallow and Deep Depth of Field. We'll post them next class.
It is measured in a thing we call the F number.
As you decrease the size of the Aperture you increase the amount of the picture that is in focus. This is called Depth of field.
Watch the following video for a good explanation of how Aperture works. We'll began using different F Stops and doing Depth of Field exercises later in class.
http://www.youtube.com/watch?v=lUbjkMm_v-A
Depth of Field is the amount of the image that is in sharp focus
Here is the a link that describes how and when to use Aperture Priority
Here's link that descibes how to take better pictures using Aperture Priority.
Use the Nikons to experiment with Depth of Field around the building. Take pictures with both Shallow and Deep Depth of Field. We'll post them next class.
Friday, January 18, 2019
Shutter Speed Exercise - Post to Your Blog
In 3 correctly exposed (not underexposed or overexposed) capture an example of the following:
Label each picture with the shutter speed and ISO you used.
See the examples below.....
Freezing Action
Shutter Speed 1/1250 seconds
ISO 3200

Motion Blur
Shutter speed 1.6 seconds
ISO 100

Tracking
Shutter Speed 1/3 seconds
ISO 400

- Freezing Action
- Motion Blur
- Tracking
Label each picture with the shutter speed and ISO you used.
See the examples below.....
Freezing Action
Shutter Speed 1/1250 seconds
ISO 3200

Motion Blur
Shutter speed 1.6 seconds
ISO 100

Tracking
Shutter Speed 1/3 seconds
ISO 400

Subscribe to:
Posts (Atom)
-
Sorry I am not with you today. Please complete your Final Portfolio this morning and check your grades for any work you still may need to ...
-
Examples of Design Principles in Photography Texture - Take a Close-up pic to capture rough, smooth, cracked, bumpy, etc Variety - Tak...
-
Today you will take pictures using the Rule of Thirds. You will need to post 6 examples of the Rule of Thirds to your blog. For each exampl...

